Friday, November 10, 2017

Sitecore Symposium & MVP Summit 2017 - Las Vegas

This years (2017) Sitecore Symposium was at The Mirage Hotel, Las Vegas which was attended by around 3000 Sitecore customers/partners/employees. (https://www.sitecore.net/events/symposium-2017/introduction.aspx). Sitecore Symposium is the main event of the year organized by Sitecore.


Sitecore was generous to provide all the Sitecore MVPs who attended the Sitecore Symposium with a chance to take newest Sitecore 9 Certification examination for free.

I was also able to do the online Sitecore 9 course and take the certification examination at the Symposium. And got pass with 98% pass mark for the examination, highest marks with few other MVPs from the first batch of people who took Sitecore 9 certification.


After attending the Sitecore Symposium, Sitecore MVP Summit started. Sitecore MVP Summit is the event organized by Sitecore to provide insights into Sitecore product and future plans to Sitecore MVPs. This was one and half-day event which also organized at The Mirage Hotel, Las Vegas.

After keynotes by Sitecore product teams, we attended the Sitecore MVP party which was organized at the TopGolf at Las Vegas. It was a fun event.


Overall, it was fun week with lot of knowledge sharing and also meeting all the Sitecore community friends.


Until next Sitecore Symposium & MVP Summit, Happy Sitecore !!

Saturday, November 4, 2017

Sitecore 9 Admin Tool to View Config Layers & Config Roles

With the latest release of Sitecore 9, Sitecore has introduced lots of good changes to config file patching. These includes categorizing configurations to Configuration Layers & Configuration Roles.

+Kamruz Jaman has written a great blog post on what are these new changes here

With these new additional configuration patching options, it might be bit difficult to track which configs are patch to which Configuration Layers OR which Configuration Role.

But not to worry.

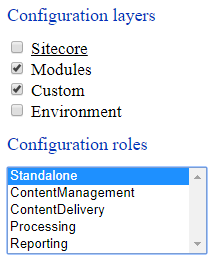
Sitecore has provide a new Sitecore admin tool, Showconfiglayers.aspx, which will allow you to view the configurations filter by Configuration Layers, Configuration Roles or any combination of those.


For example, if you have selected following options and click on the "click to see result configuration" link, a new webpage will be open with showconfig.aspx file with the selected filters added as query string parameters.


http://sc900rev170622/sitecore/admin/showconfig.aspx?layer=Modules|Custom&role=Standalone


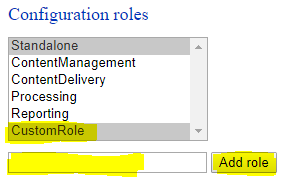
Also, it support custom configuration roles also, by allowing you to add those into filters. 

Just type the custom role into text box and click "Add role" button. 


As I mention earlier, this new showconfiglayers.aspx file will open showconfig.aspx file with those selected Config layers & config roles added as query string parameters. So, most easiest way is to directly type those parameters into good old showconfig.aspx admin tool url, which should provide you with the same results.

http://sc900rev170622/sitecore/admin/showconfig.aspx?layer=Modules&role=CustomRole


UPDATE : 05/11/2017There is an official documentation regarding the same topic which I found today, you can refer it from following url
https://doc.sitecore.net/sitecore_experience_platform/developing/developing_with_sitecore/customizing_server_configuration/view_configuration_changes

Happy Sitecore!!


Thursday, November 2, 2017

Validate Sitecore Web Forms for Marketers Telephone field for Length

I know Sitecore Web Forms for Marketers module will be deprecated with Sitecore 9 release, with the introduction of Sitecore Forms module.

Nevertheless I thought to write a quick post on a recent simple issue that I had to try and find a solution for.

In one of my current projects, I had to add a length validation to Telephone field in WFFM form.

So, I just added another validation to Telephone field definition item in WFFM (see Image-1).

Image-1 : Adding "count chars" validation to Telephone field

Then I tested the form. Even thought validation worked, it was considering 0 as Minimum Length & 256 as Maximum Length of that field value. There were the default values define for Single-line text field class in Sitecore.

Even though we can see Minimum Length & Maximum Length fields for WFFM Single-line text field (see in image-2), WFFM Design interface for Telephone field does NOT display any Minimum Length & Maximum Length field (see image-3).


Image-2 : WFFM Single-line Text Field Design Interface

Image-3 : WFFM Telephone Field Design Interface


But, If you look at the Telephone field definition in WFFM (see Image-4), you can see it is using "Sitecore.Forms.Mvc.ViewModels.Fields.TelephoneField,Sitecore.Forms.Mvc".

Image-4 : Telephone Field Definition Item


So, once I looked into the code base for that class by decoding the Sitecore.Forms.Mvc.dll, I could see it was extending the Single-line text field class (see Image-5)

Image-5 : TelephoneField Class


So, as you know, SingleLineTextField is created to use Maximum Length & Minimum Length properties.

Finally, to get these length validations to work, all I had to do is add following parameters to "Parameters" field of that Telephone field item (see Image-6)

<MinLength>10</MinLength><MaxLength>15</MaxLength>


That was it. After that, Telephone field validation works as I needed with 10 characters as Minimum Length and 15 characters as Maximum length.

Hope this helps to someone ! :-)

Sunday, August 20, 2017

Useful Extra Settings to be used with Multi-Site Clones

Recently we worked on a Sitecore solution where Clones are in multi-site scenario with each site have its own home node. So, for example, blogs that are created in global Home node is migrated to country home nodes.

Force Update on Clones

One major option that was useful in this scenario was Auto Accepting changes done to the source item in clones. Otherwise editors have to go into clone items and accept changes if any modification done to the source items.

This feature was added to most recent releases by default, but some older releases needs code implementation to get this functionality to work. Following article in Sitecore knowledge base explains this.

https://kb.sitecore.net/articles/820842

The setting which should be enable displays below

<setting name="ItemCloning.ForceUpdate" value="true"/>  

Inherit Workflow State to Clones

Next important setting to be set was making the clone items inherit the workflow status from the source item. This should be set to true to prevent any unwanted items getting published to publich website. In my opinion, this setting should be set to true by default by Sitecore.

<setting name="ItemCloning.InheritWorkflowData" value="true"/> 


Delete Clones when Original Item Deleted

Setting this one depends on your project requirement. But, in our scenario we didn't wanted to keep the clones when original items were deleted. So, we set the following setting to true.

<setting name="ItemCloning.DeleteClonesWithOriginalItem" value="true"/> 


Relink Clones to Its Sub Tree

This is also an important setting to be set to true. When in a multi-site scenario with multiple home nodes for each site, it is NOT enough to just clone the items into country nodes. Those item links should also be pointing to its own home node paths.

By default this setting is set to false. We enabled it in our site

<setting name="ItemCloning.RelinkClonedSubtree" value="true" />


Tuesday, March 21, 2017

Preview Site Not Pickup Correctly In Multi-Site Setup For Preview OR Experience Editor On Sitecore 8 Versions

Recently I was working on a project where we converted the existing single site setup into multi-site setup.

After the conversion to multi-site setup, there were few issues reported related to local site settings were not pick-up correctly. Following are the few issues reported

Issue 1 :

When try to open Experience Editor from Sitecore Launch Pad, it didn't open the correct local site, but open the Eperience Editor for default site (i.e. "website")


Solution:

This was mention on several articls and the solution was to

1) Open the “/sitecore/client/Applications/Launchpad/PageSettings/Buttons/ContentEditing/ExperienceEditor” item in the core database
2) Change the “Link” field value to: /?sc_mode=edit&sc_resolvelanguage=0

https://community.sitecore.net/general/f/11/t/2835


Issue 2 :

When try to open the Experience Editor for an item from Content Editor, it always set the "sc_site" parameter to "website". So, it also was not picking-up the correct context site.

website.local?sc_mode=edit&sc_itemid=%7bB338C802-17A7-4D71-A5E8-4E6C4B7EEC6E%7d&sc_version=3&sc_lang=en-US&sc_site=website


Solution:


Sitecore has reported this as a known issue and has provided fix in the following knowledge base article.

Quote:
In multi-site Sitecore solutions, the Preview functionality of the Content Editor or Page Editor may incorrectly resolve the site the previewed item belongs to.The context site may be resolved according to the value of the Preview.DefaultSite setting, or set to website as default.

https://kb.sitecore.net/articles/382913

After the above fix is implemented, site context site resolved correctly.

website.local?sc_mode=edit&sc_itemid=%7bB338C802-17A7-4D71-A5E8-4E6C4B7EEC6E%7d&sc_version=3&sc_lang=en-US&sc_site=US

Friday, March 3, 2017

My First Major Sitecore PowerShell Extension Workout

One of my recent tasks was to make a content node with child items to fallback to "en" language version, for all existing languages.

Since there were lot of child items, I thought to use the Sitecore PowerShell module and do it using script.

Sitecore PowerShell Extension module can be downloaded from https://marketplace.sitecore.net/en/Modules/Sitecore_PowerShell_console.aspx

During my task, I faced several obstacles. But all solved using PowerShell scripts.

First thing I did was Google..

I found following article, which contains most of the functionality I needed.

https://mtgeekblog.wordpress.com/2016/11/30/first-blog-post/


Then, I needed to restrict the code to only change workflow state on all the language except "en" language.

I posted my question on Sitecore Slack Chat in #module-spe channel.

(In case if you are not yet a member of Sitecore Chat channel, you can send a request to access it using https://docs.google.com/forms/d/1bAVDgP5-FhFh8ohPchHtifq-rz7EBkuPojAzdEofJyo/viewform?edit_requested=true )

Luckily, Sitecore PowerShell module creates was on Sitecore Slack Chat Channel also. They helped with that problem.

get-childitem . -recurse -Language * | where-object { $_.Language -ne "en" }

Then, I faced another strange issue. When run the following script, it only returned few language versions per an item. But, I know there were lot of other language versions for this same ite.

get-item . -Language * | Format-Table Id, Name, Language, __Workflow, "__Workflow state", "__Default workflow"

What I find out was, we are using Sitecore "Language Fallback" feature on these items. When that "Language Fallback" checkbox is checked, it somehow only took few item versions.

But, No problem. I ran following script on the child items, which sets the "Enable Item Fallback" checkbox Un-Checked. Then run the scripts. Then again make the "Enable Item Fallback" checkbox Checked.


Another Issue I faced was, when I try to remove language versions from an item, the script didn't do anything.

That is also caused by the Language Fallback feature. So, When you are running version related scripts (EX: Checking the language versions, Removing language versions, etc), first make the "Enable Item Fallback" Un-Checked, before running the Script.


From todays experience with Sitecore PowerShell Extension module, I understand that it is a must have tool for Sitecore Developers.

I will post more about the things I learn with PowerShell Extension in coming days.

Happy Sitecore and Sitecore PowerShell :-)

Sunday, February 26, 2017

My Footsteps On Configuring Sitecore Publishing Service 2.0

Recently I was task with configuring the latest Sitecore Publishing Service 2.0 into an existing Sitecore 8.2 environment. Following are the few points that I thought good to mention from my experience.


You can download the software and documentation with all the information from following link
https://dev.sitecore.net/Downloads/Sitecore_Publishing_Service/20/Sitecore_Publishing_Service_20_Initial_Release.aspx


After downloading, I installed the Pre-requisit of Windows Server Hosting (.NET Core) into the machine.

Then I followed the "Scripted Installation" option described in the documentation. It was much easier than the manual installation and provided lot of easy options.

Few points from my setting-up experience mention below.

1) Setting-up Connection Strings

For example, I ran the following command to setup 'Core' connection string


$ Sitecore.Framework.Publishing.Host configuration setconnectionstring core '<your_connection_string>' 

This will setup connectiong string on following file
<Publishing_Service_Web_Root>/config/global/sc.connectionstring.json 

Note that, it will automatically add "MultipleActiveResultSets=True;" to your connection string to support Multiple Active Result Sets (MARS).


2) Adding support to Multiple Active Results Sets on Sitecore Installation Connection Strings

To support Mutiple Active Result Sets (MARS) you have to add "MultipleActiveResultSets=True;" to end of your connection strings in your Sitecore installation.

i.e. to <Sitecore_Website_Root>/App_Config/ConnectionStrings.config

  <add name="core"  connectionString="Integrated Security=true;Data Source=(local);Database=sitecore_core822;MultipleActiveResultSets=True;" />
  <add name="master"  connectionString="Integrated Security=true;Data Source=(local);Database=sitecore_master822;MultipleActiveResultSets=True;" />
  <add name="web"  connectionString="Integrated Security=true;Data Source=(local);Database=sitecore_web822;MultipleActiveResultSets=True;" />

3) Remember to do IIS Reset for Publishing Service Website Once you do any Configuration Updates 

Not like Sitecore, you will have to do IIS Reset for Publishig Service Site to make your Configuration changes in Sitecore Publishing Service Website to take effect.